We will start with the before pictures:

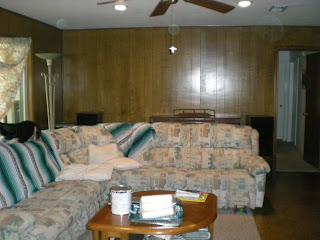
The view from the corner of the living room looking at the kitchen/breakfast nook. The paneling has been there since the house was built. It looks almost exactly the same as the day we moved in (different furniture of course). But the flooring, brick fireplace, and walls are the same.


It's interesting how green the wood looks after years and years. Notice the sheet covering up the very nice new windows that were put in. This view is standing in the kitchen looking into the living room. Connie bought the sectional when dad was away when she wanted a 'southwest' look for the room.

This is in the kitchen looking into the breakfast nook. Connie painted over the border at the top of the kitchen, plus the upper walls in the breakfast nook and painted the paneling at the bottom of the breakfast nook. The cabinet doors were removed before we got there, but everything was left inside.

Another view of the kitchen. The countertops and appliances are all the same, except the fridge and dishwasher. Connie had done some research on paint colors with countertops, so we based our surprise off of things that went along with her ideas. But we couldn't ask her what colors she wanted because that would ruin the surprise.
The first step was to get in there and do any repairs necessary, and start priming everything. There was no time for pictures during the work, so I will just give a quick run-down of what we did:
Thursday Evening:
1. Ripped out corner/edge pieces from the paneling to make it look like regular drywall.
2. Primed the entire kitchen base cabinets (just the outside)
3. Primed the living room walls, trim, and window sill
Friday:
-spent 1.5 hours removing hinges and pulls from all doors and drawers by hand with no drill
4. Floated out the seams in the paneling one by one with mud
5. Primed both sides of the cabinet doors in the garage
*During step 5, Liz came by and asked me to be her Maid of Honor!! That was the highlight of the weekend- dirty, paint covered me crying in the filthy garage. Then I took a break and picked up Bean from the airport and had dinner with Mom.
6. Floated out the living room using the magic trowel (it's amazing!), including fixing the corners with corner pieces from Home Depot. We stopped when we ran out of mud at about 1am.
Saturday:
We went and did the SCOPE walk first thing and had lunch afterward. This was the original reason for coming to Houston.
7. Finished floating out the walls in the living room.
8. Painted the trim in the living room
9. Painted the base cabinets in the kitchen
10. Painted both sides of the cabinet doors
11. Repeat all of the above. Twice in some areas. (yes, that is 3 coats)
It is very hard to go light over dark. If I could go back, we would have primed it twice, and then done 2 coats of paint instead of 1 coat of primer and 3 coats of paint. Primer is cheaper than paint, and easier to work with, especially water-based cabinet paint!
Through all of it, we caulked as necessary- around the edges in the living room, to fix cabinet doors and drawers during painting, etc. Caulking is my favorite because you can see the difference you are making. And you know that you are helping it to work better.
Sunday:
Came to terms with the fact that we wouldn't be done with the project that weekend and decided to get as much done as we could. We put all the new pulls and hinges on the doors and drawers and there was plenty of cussing as I cleaned and Bean tried to get the doors to hang correctly without using a drill (there wasn't one available!).
Note to self: Hanging cabinet doors with new hinges SUCKS.
We took pictures and got cleaned up, ate lunch at James Coney Island (Bean's first time, he wasn't impressed) and drove home.
Here is how we left it:


You can almost see the uneven-ness in the walls in this one. Mud has to dry 24 hours between coats, and when you are floating paneling it takes at least 2-3 coats. Especially if you are a novice floater like me. That's why I did a coat just on the seams before Bean came, and the magic trowel really worked for the second coat.


The new paint makes the ovens look really old!

Notice the one cabinet door that wouldn't close right. I think that's the one that still doesn't close right.

And here's a close-up of some kitchen drawers.
After that weekend, I knew we needed to finish what we started, but was so drained, we decided to wait a month until we went back. That gave me 2 weekends to work at my store and one weekend at home to relax. Then we found out that Dad and Connie would be going to the house the Thursday before we came back (on a Friday) to finish the job! So they would see the place halfway done!!
That was my worst nightmare. I grew up watching Trading Spaces, where the owners walk in and are excited and shocked by the outcome and they almost always love it. We didn't get that.
0 comments:
Post a Comment